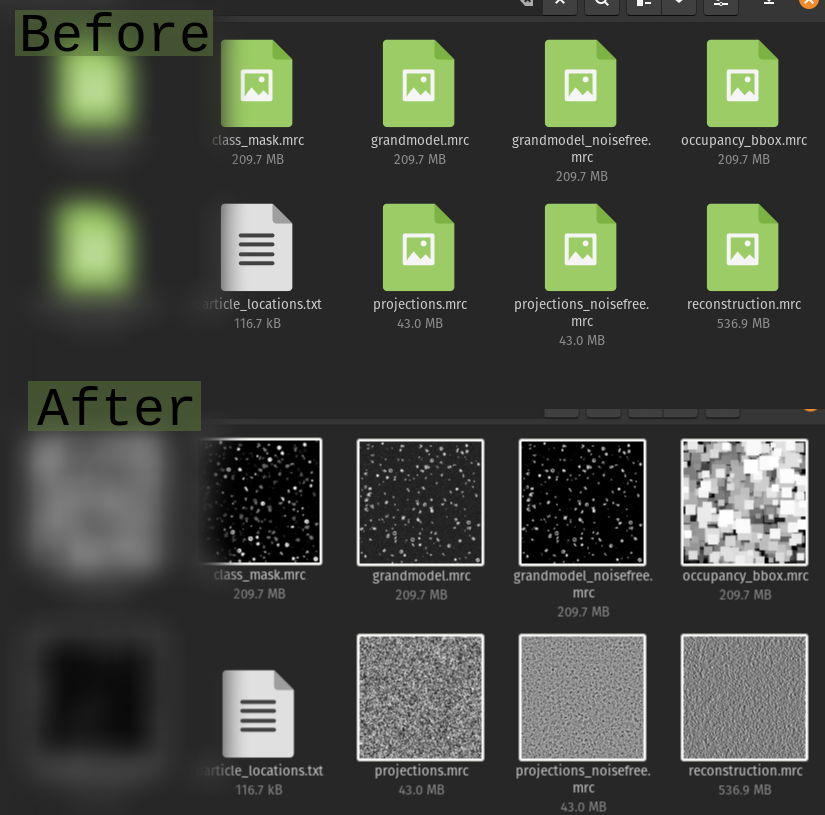
Developing a custom thumbnailer for Nautilus
GNOME Nautilus Thumbnails Python MRC2014
Linux file managers, such as GNOME’s Nautilus (used by default in Pop OS and Ubuntu), display thumbnails for files instead of generic icons. For example, a “screenshot” of the first page of the PDF document or the first frame of a GIF. A thumbnailer is a program that given an input file generates such representation. I work a lot with a 3D imaging format called MRC2014, as published by Cheng et al. (2015). It is a common for cryo-electron microscopy and tomography, maintained by CCP-EM on behalf of the EM community. Depending on the binning (downsampling) level of the data, a file can be anywhere from a couple of megabytes to many gigabytes. While scientific packages such as ImageJ/Fiji or UCSF Chimera can open the files, it is still a custom format without thumbnails. Descriptive file names help, but as the proverb goes, a picture is worth a thousand words. So, one weekend evening I have decided to learn how file managers generate thumbnails and develop one for MRC files.
There is a ton of information about thumbnailers online, but to my surprise, it is very assorted and often outdated. For example, an official GNOME document that explains how to add thumbnailers and comes up on the top of search results is from 2006 and is not applicable since 2011. I have decided to write down the steps I had to do for my thumbnailer in hopes that this will be useful for somebody some day.

Add MIME type
First, we need to register the filename extension (i.e., .mrc) in a system MIME type database: we create an XML file that describes MIME type with a shared-mime-info schema, add this file with the rest and update the database. It is not necessary to fill all the elements, and for my case it just enough to specify mime type, name, generic icon (shown before thumbnail is generated or if generation has failed) and filename extension matcher. Type should be unique on the system and there can be multiple extension matchers, i.e. lowercase and uppercase.
<?xml version="1.0" encoding="UTF-8"?>
<mime-info xmlns="http://www.freedesktop.org/standards/shared-mime-info">
    <mime-type type="image/mrc">
        <comment>MRC2014</comment>
        <generic-icon name="image-x-generic"/>
        <glob pattern="*.mrc"/>
    </mime-type>
</mime-info>
Copy this file to /usr/share/mime/packages/ and run sudo update-mime-database /usr/share/mime/packages.
Thumbnailing script
Now, we need to write a program that would actually generate a thumbnail image. The program must accept three arguments: path to the input file, path to the output file and thumbnail image size (the thumbnail is square).
For my usecase, I decided to write a Python script that loads the central slice of a tomogram, rescales the intensities to 0-255 to show as an image, downsizes to the thumbnail size and saves it to the given output path. MRC format itself is pretty complex, with an extensive header that stores various metadata. Luckily, CCP-EM maintains a very convenient Python library that makes loading the files a breeze, mrcfile. Together with NumPy and Pillow, the script looks something like that:
#!/usr/bin/python3
# -*- coding: utf-8 -*-

import numpy as np
import sys
import mrcfile
import argparse
from PIL import Image
import warnings
warnings.simplefilter('ignore')

# Intensity rescaling helpers
# Shamelessly adapted from scikit-image
def rescale(image, in_range) -> np.ndarray:
    imin, imax = in_range
    image = np.clip(image, imin, imax)
    image = (image - imin) / (imax - imin)
    return np.asarray(image * 255., dtype=np.uint8)

if __name__ == '__main__':

    # parse arguments
    parser = argparse.ArgumentParser(description='Generate thumbnails for .mrc images')
    parser.add_argument('input',    type=str,   help='Path to input mrc file')
    parser.add_argument('output',   type=str,   help='Path to output png thumbnail')
    parser.add_argument('size',     type=int,   help='Thumbnail image size')
    arguments = parser.parse_args()

    # mmap the input file
    f = mrcfile.mmap(arguments.input, permissive=True)

    # extract central slice
    if len(f.data.shape) == 2:
        data = f.data
    elif len(f.data.shape) == 3:
        data = f.data[f.data.shape[0] // 2]
    else:
        f.close()
        sys.exit(-1)

    f.close()

    # contrast stretching to 2-98 percentile
    p2, p98 = np.percentile(data, (2, 98))
    data = rescale(data, in_range=(p2, p98))

    # rotate 180 deg and flip to be consistent with imagej/fiji
    data = np.rot90(data, 2)
    data = np.fliplr(data)

    # convert to PIL
    img = Image.fromarray(data)

    # resize to the thumbnail size
    img.thumbnail((arguments.size, arguments.size))

    # save image
    img.save(arguments.output)

    sys.exit(0)
The script must be runnable (sudo chmod a+rx) and be in PATH, i.e. /usr/bin.
Thumbnailer
.thumbnailer files link together MIME types and thumbnailer programs. The file must be copied to /usr/share/thumbnailers/.
[Thumbnailer Entry]
TryExec=/usr/bin/mrc-thumbnailer
Exec=/usr/bin/mrc-thumbnailer %i %o %s
MimeType=image/mrc
Putting it all together
An important thing to keep in mind is that Nautilus has a file size limit for thumbnailing: anything above a specific threshold will not be passed to the thumbnailing script. You can adjust in Nautilus: go to Preferences -> Search & Preview -> Thumbnails section.
Now that everything is in place, quit all Nautilus processes and delete cached thumbnails: nautilus -q and rm -r ~/.cache/thumbnails. Open any folder with files of your interest and the thumbnails should be there!
Developing a custom thumbnailer turned out to be quite an easy, one evening project and is a neat quality of life work improvement. If you intend to distribute the thumbnailer I suggest using a Makefile to automate the installation. You can find my complete MRC thumbnailer on github: the-lay/mrc-em-gnome-thumbnailer. December 2021 Update: I have added .em file handling too and renamed the project to mrc-em-gnome-thumbnailer.
– Ilja
